A little bit of rewind
I did plan how I was going to construct this, but it was only in my head.
Later I sat down and made some drawings, I needed a rough plan to follow, the trick is to not slavishly follow a plan but be flexible as you go along. Many things in a 2D drawing will not translate directly into a 3D object, materials won't always behave the way you would like and that darn 3rd dimension can trip you up especially when you're trying to get two surfaces to meet perfectly...

Everybody makes mistakes, I will no doubt make many as I continue, it impossible to document every tiny step however if and when I mess up, I will be honest. Every failure is a stepping stone and not a brick wall, working with unfamiliar materials will always be a learning curve.
My first attempt at making a disk to seal the barrel up were less than successful.
The idea was to seal the end with a disk with curved edges riveted directly to the inside body of the barrel, a little sawing and a helluva lot of hammering, bending and sweating later, it became apparent that bending the metal in a neat useable way was going to be very , very tricky. Either beyond my skills or out of reach using the tools I have at hand.

The results were not great, I abandoned this approach in favour of a simpler one.
Plan B: From a functional point of view all I need to do is seal the ends of the barrel, its that simple.
Armed with that information I decided on different line of attack, a better way might be to create two metal shims and affix them to the inner edge of the barrel ends and secure a flat plate against them ( no bending required) thus creating a better, neater air seal.

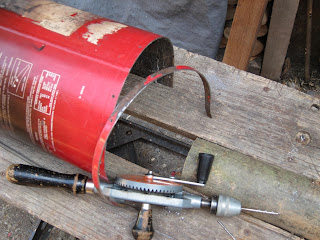
I mentioned before the best way to saw a cylindrical objects ( such as barrel ) is to secure it with a ratchet strap. then saw -turn , saw - turn .... I recycle the chopped off base of the extinguisher to make the two metal rings I wanted.

having done this twice I now had a shim for either end.. I cut them to size and slightly bent the edges to match the horseshoe shape of the barrels outward turned edges.

Drilled and holes and matched them to holes in the barrels body.
And riveted away ..

I now need to make a pair of disks to match the profile of the barrel and sit behind the shims at either end to created the closed barrel which one day will contain the fire.
I did plan how I was going to construct this, but it was only in my head.
Later I sat down and made some drawings, I needed a rough plan to follow, the trick is to not slavishly follow a plan but be flexible as you go along. Many things in a 2D drawing will not translate directly into a 3D object, materials won't always behave the way you would like and that darn 3rd dimension can trip you up especially when you're trying to get two surfaces to meet perfectly...

Everybody makes mistakes, I will no doubt make many as I continue, it impossible to document every tiny step however if and when I mess up, I will be honest. Every failure is a stepping stone and not a brick wall, working with unfamiliar materials will always be a learning curve.
My first attempt at making a disk to seal the barrel up were less than successful.
The idea was to seal the end with a disk with curved edges riveted directly to the inside body of the barrel, a little sawing and a helluva lot of hammering, bending and sweating later, it became apparent that bending the metal in a neat useable way was going to be very , very tricky. Either beyond my skills or out of reach using the tools I have at hand.

Plan B: From a functional point of view all I need to do is seal the ends of the barrel, its that simple.
Armed with that information I decided on different line of attack, a better way might be to create two metal shims and affix them to the inner edge of the barrel ends and secure a flat plate against them ( no bending required) thus creating a better, neater air seal.


having done this twice I now had a shim for either end.. I cut them to size and slightly bent the edges to match the horseshoe shape of the barrels outward turned edges.

Drilled and holes and matched them to holes in the barrels body.


No comments:
Post a Comment